Introduction
With home automation expanding faster than ever thought and new products constantly coming out the DIY space is increasingly getting bigger as well. One of those companies joining in the DIY space is Itead Studio. About 10 months ago Itead Studio came out with their Sonoff and Slamphor solutions and have quickly built on these two platforms.
Recently Itead Studio brought out two new home automation products that complement their current products. The Sonoff TH allows the user to automate a devices on/off control based on either temperature or humidity. The other product recently introduced is the Sonoff SV. This Sonoff works off DC voltages ranging from 5V - 24V.
The Sonoff TH was added to support common residential devices such as fans and humidifiers. The Sonoff TH currently only allow the connected device to be switched based on either temperature or humidity, not both.
Hardware overview
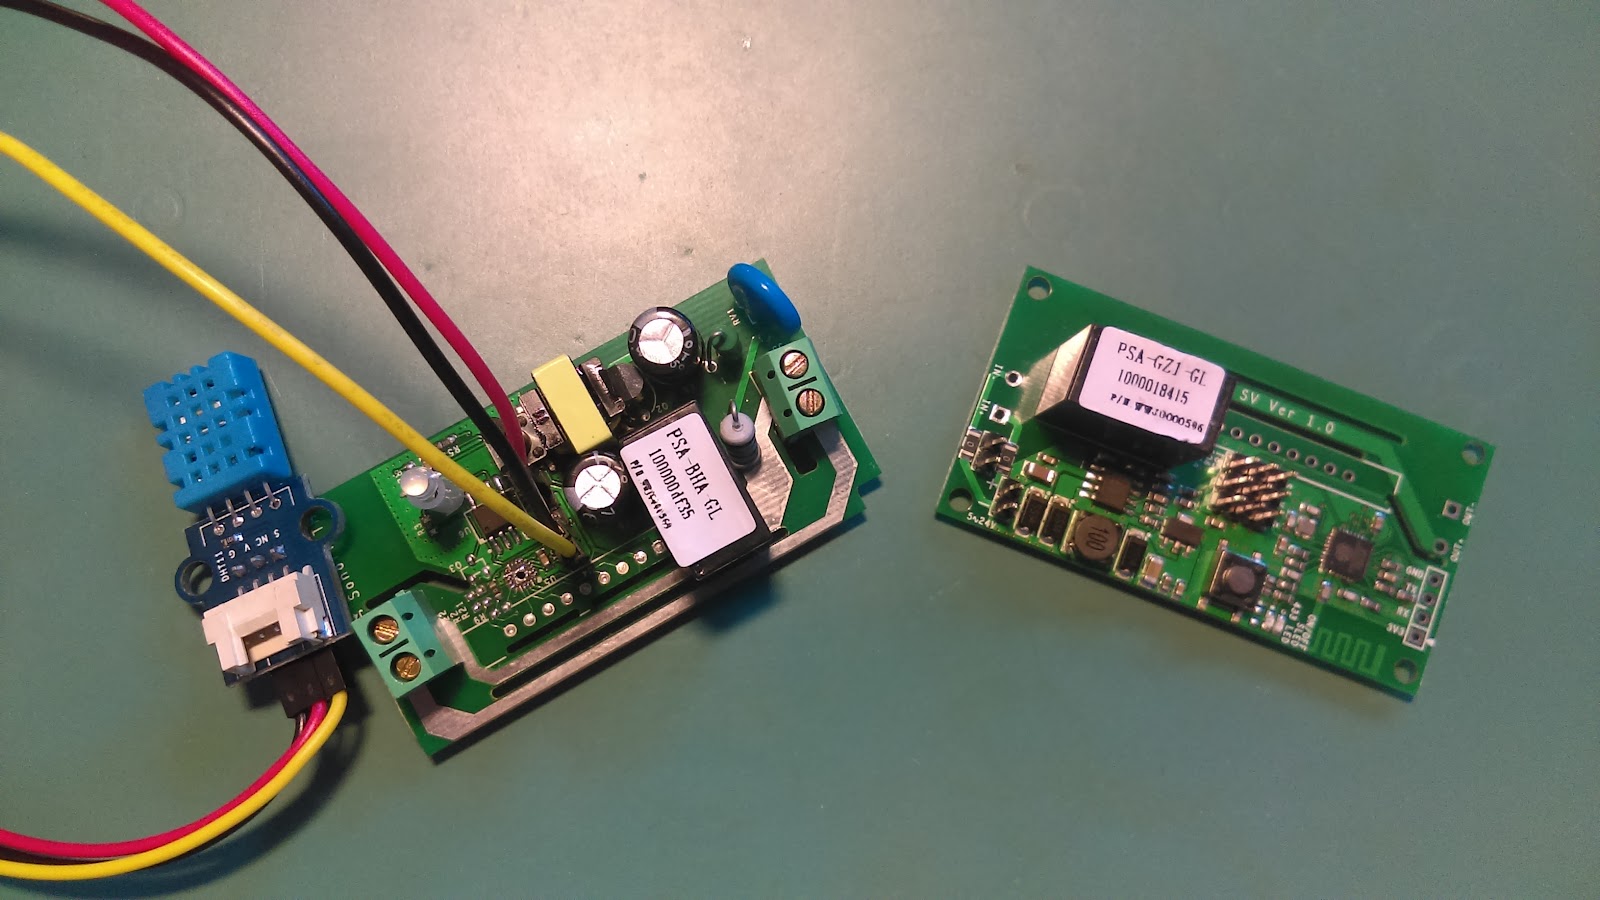
The Sonoff TH and SV internals have for the most part not changed very much from the original Sonoff. They still use a a 250V and 10A relay to do the switching on and off of the main power. The WiFi controller is the very popular and well used ESP8266EX. The onboard memory has been changed from Winbond to another company but I assume the general operation remains pretty much the same.
The main differences between the Sonoff TH and SV is in the power circuitry. With the TH needing to step down from 120V ~ 240V to 5V there is a transformer a bridge rectifier as well as other components to help stabilize and smooth out the incoming voltage. The Sonoff SV does not use mains voltage but rather uses 5V ~ 24V and as such only has a step down voltage regulator that outputs 3.3V to power the ESP8266.
It is interesting to note that both the TH and SV appear to have a location to connect the 433MHz RF module even if the code is missing to utilize them. Also the SV which should only operate 5v ~ 24V has the same track layout and spacing as the original Sonoff and TH.
Inline installation
Setting up the Sonoff TH is relatively simple for anyone with basic knowledge of AC electricity. The most complex part is knowing which of the spliced wires in neutral and and which is live. A quick search will show that (at least for North American plugs) the large prong on the plug is neutral and the smaller one is live.
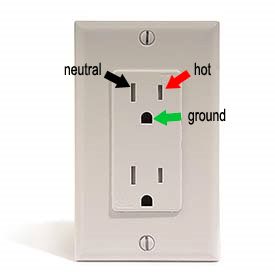
I say large and small prong because a decent number of home appliances use two unmarked conductors. This leaves the the only way to know which is neutral by looking at he connected plug. This leads to an ongoing issue with the Sonoff devices, lack of a third pin. With more devices including a ground connection, not having this connection leads to messy and possibly dangerous wiring. Currently the only workaround would be to leave the ground wire uncut and wire it around the outside of the Sonoff.
![[000099]-001.jpg](https://lh3.googleusercontent.com/FzY1rQT4BL5Zr-CrR8NiKsC_JUwygySjJ3fYiUtNVv8IT0TWV-uRlYDvT_YtmE4AF5gouEgdD0IuoLDj40aosjulIAInTDa84rZZReBoKLfyK1QjY9TMzmjc5ZLi9R9Ijvl0JsUp)
Sonoff TH with only two connections, live and neutral
The Sonoff SV does not have this issue if used in the DC only mode. The Sonoff SV is a bit more involved in the connections however as there is no terminal block to easily connect wires too. The Sonoff SV needs the DC leads to be soldered directly to the board or terminal blocks added first.
![[000136]-001.jpg](https://lh5.googleusercontent.com/svANllO6kJBIubx8BWXHOBNhdlBEzYFiqKDDgAB-DotDDk6b1If412vpHjKl2skYkShhi4oyEVi0gZHbkKxHyIIy73Qgh2lqEjrYAJCJerLZH627tq0BLtoUxWIIqD7l173-LjRD)
Sonoff SV without terminal blocks
Sonoff Setup
In a previous blog the steps needed to connect the Sonoff as well as connecting to the desired WiFi acces point were covered. This was mainly done due to a lack of clear instructions for those wishing to do so. Thankfully Itead Studio have updated their Wiki to not only include clear steps but GIFs showing what each LED setting means.
With the addition of these two new devices the pairing has become clearer. This was done by having the Android App take you through each step needed. You start by clicking the “+” at the bottom of the home screen to start the adding process. Once done the the app asks you to be sure the Sonoff is in pairing mode and shows you what the state of the LED should be. Then the app asks you to choose a WiFi access point and input the password for that access point. The app will then look for all devices in pairing mode and within range. Once the app has found the device, passed along the WiFi credentials and registered the device with your account you are asked to name the device. Once named and you have confirm that you have added the device correctly the Sonoff is ready to be used..
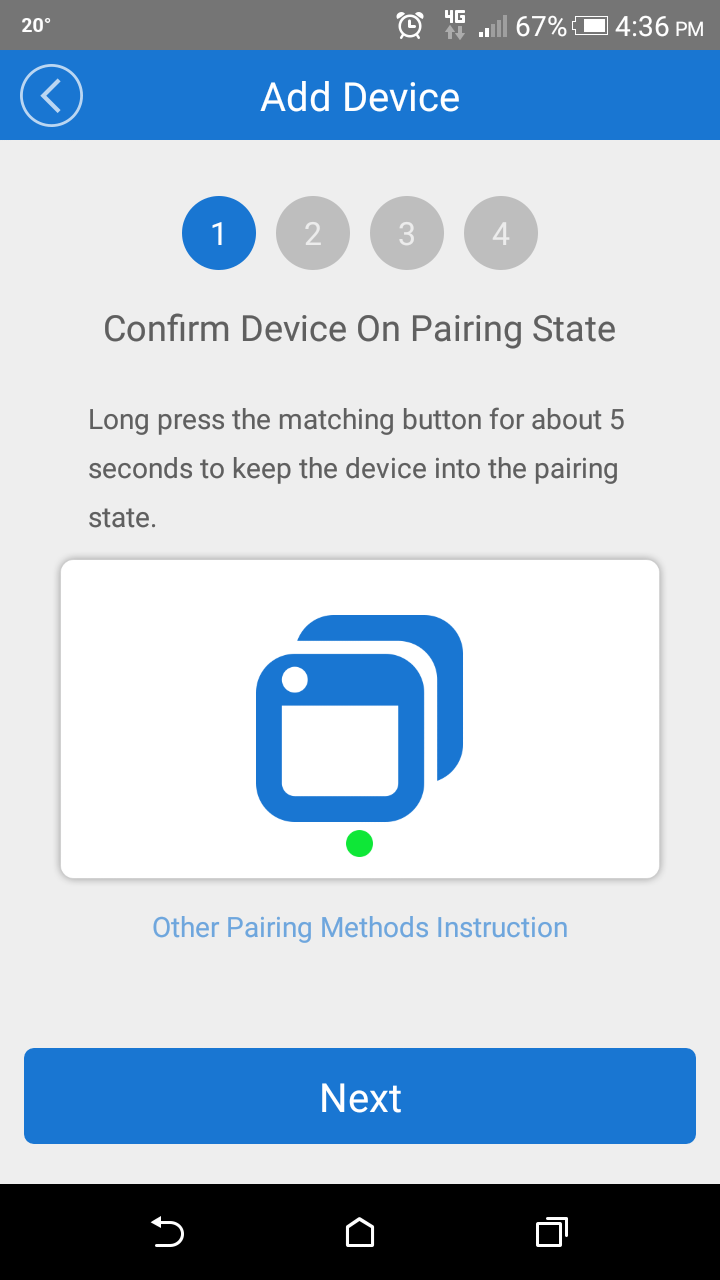


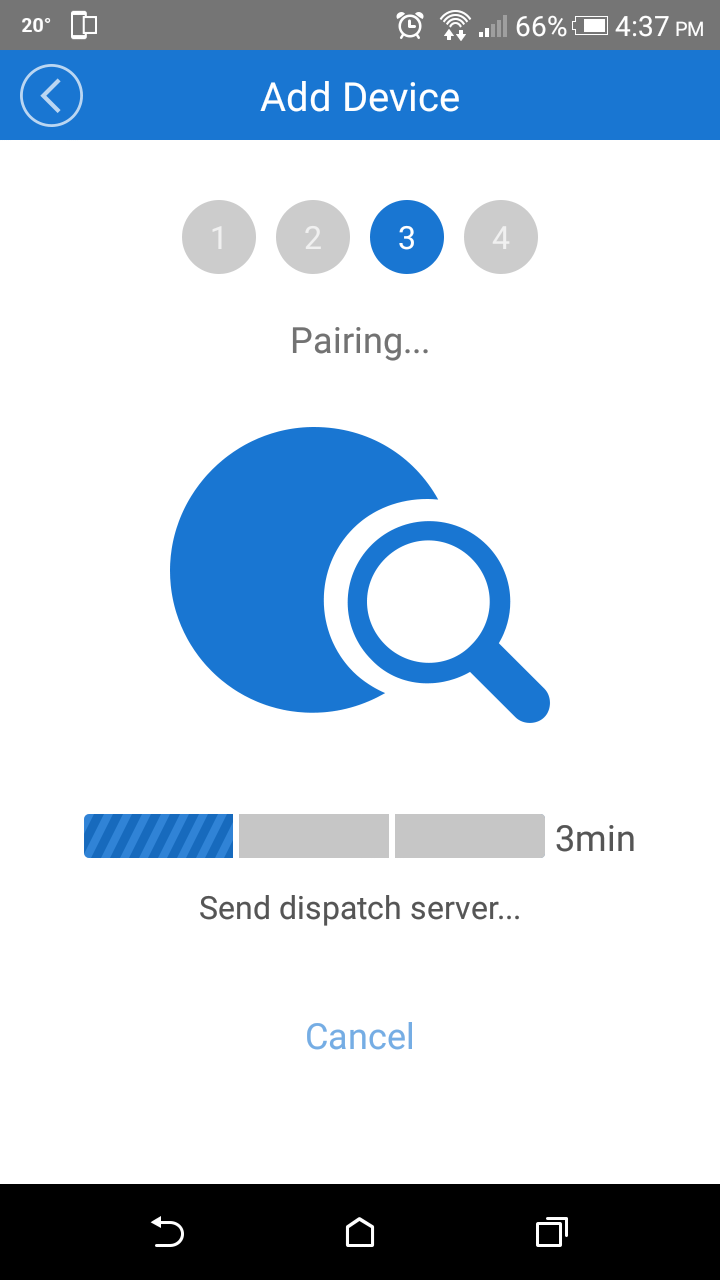
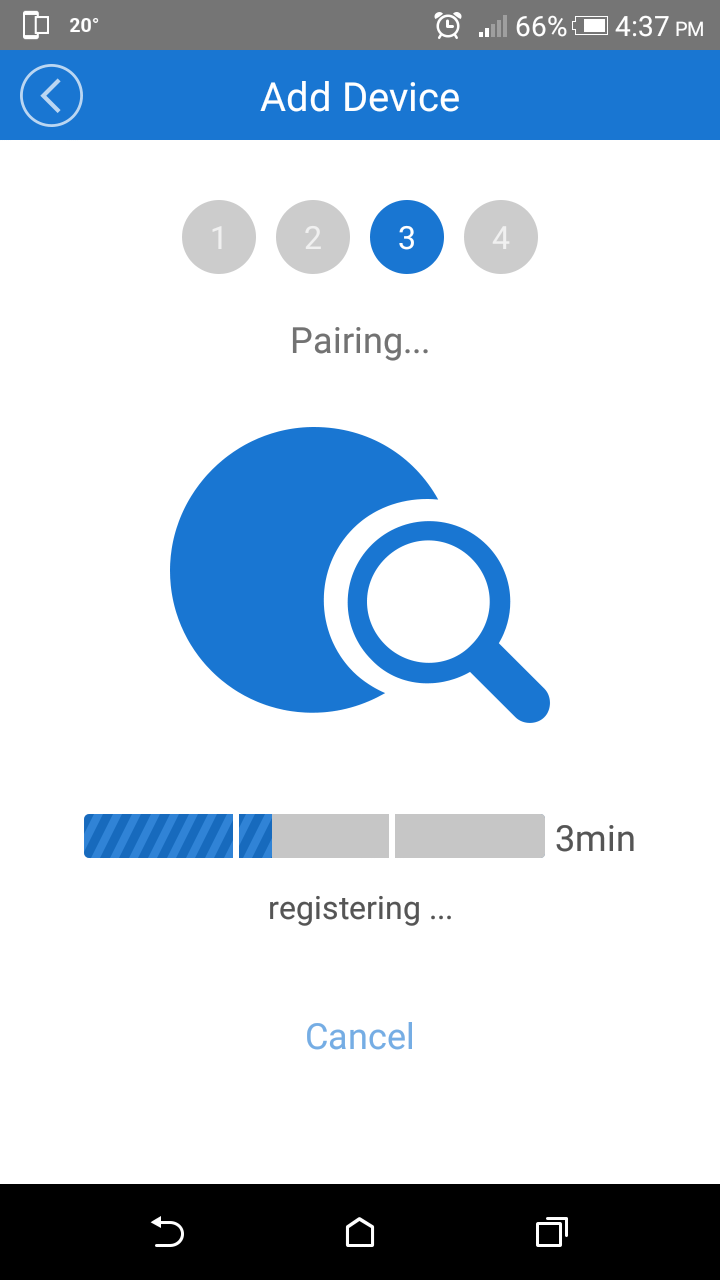

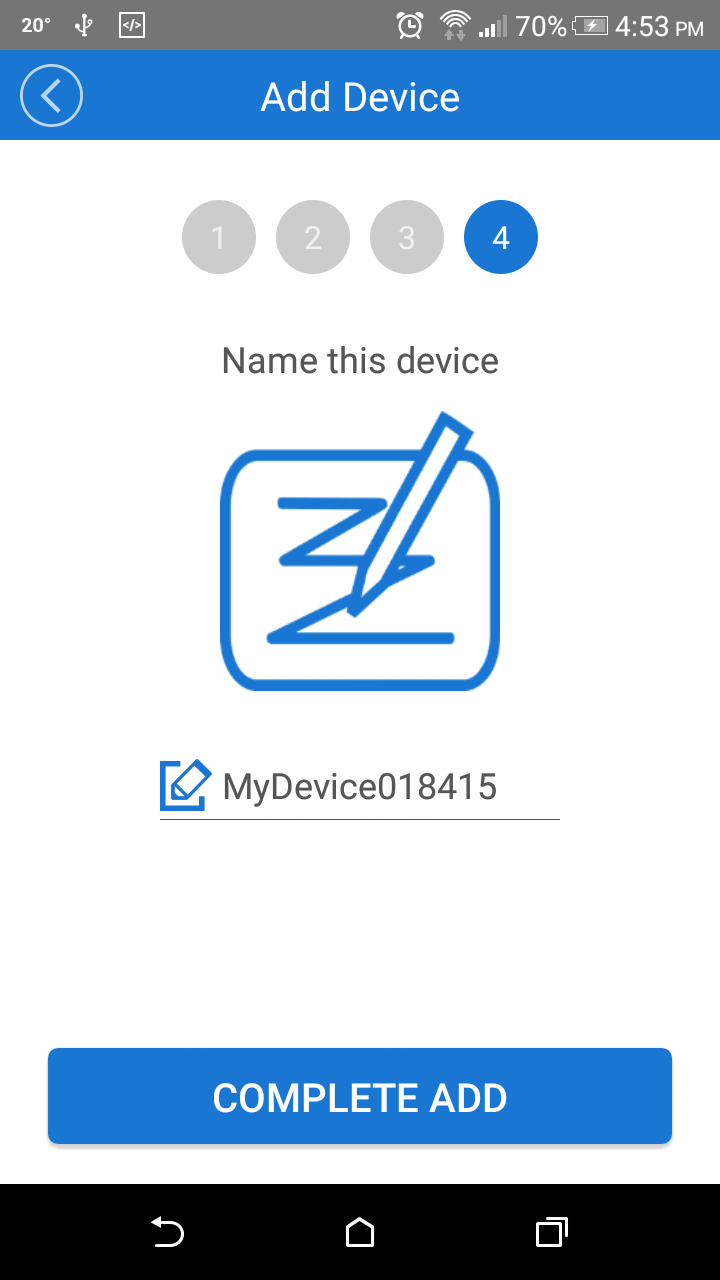

The steps taken to setup the various Sonoff devices
This is a lot clearer and simpler than the previous suide steps provided with the previous versions of the app. The only issue that persists with the e-WeLink app is the way the password for the WiFi access point is handled. I had mentioned in my previous post about 10 months ago the issue with the WiFi password being stored in plain text. I also brought this up with my contact at Itead Studio and I was informed this would eventually be changed. But as can be seen this has not be taken care of as of this writing.
Connect to WIFI
The WiFi connection between the Sonoff and the router has so far posed no issues. I have tested a few scenarios of power outages and power cycling as well and so far have experienced no issues with the Sonoff not coming back online.
The explanation of the LEDs on the Wiki have definitely increased the understanding of what state the Sonoff is in. The LEDs have also reduced the number of questions regarding how well the Sonoff is working. Overall it feels that the reliability of the WiFi connection has been increased or at least maintained from the original Sonoffs to this newer version.
App Experience and Updates
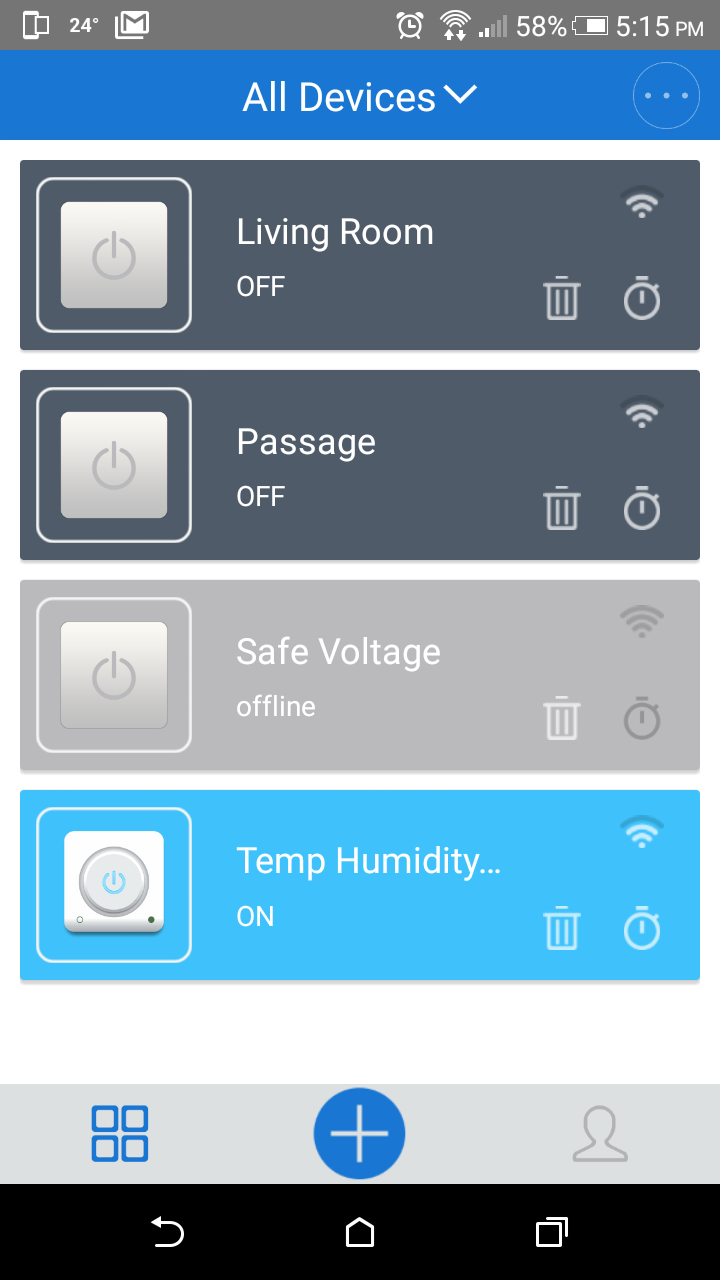
Itead Studio has also update the overall experience of the app and not just the device pairing portion. The interface is much cleaner and better organized. It is now possible to clearly see more than four or so devices in a single screen as well as the state of the device (on/off). Also updated is the ability to affect the state of manually controlled devices from the home screen. Previously one needed to tap into the device to change its state. With the newer app, this can be done by tapping the device symbol on the home screen. Also updated is the state notification. Previously there was simply a green “LED” to let know if the device wa son or not. This has now been changed to having the hole device row turn blue when on and grey when off. This makes it much clearer as to what the state of a device is at just a glance.
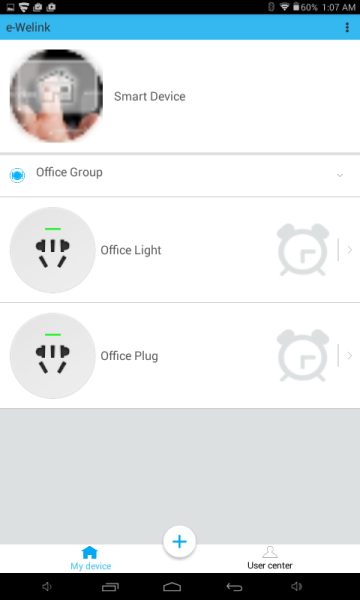

Old vs. New App
The Sonoff TH has another nice feature. When you tap into the device the current temperature and humidity reading are presented at the top. Not only does this allow you to know what the current conditions are in the area around the Sonoff TH but it also help you set the conditions for the Sonoff. By knowing the current conditions you determine if those conditions are what you want to change the state of the device or a slightly higher/lower setting be preferable.

Sonoff TH Device Screen with Real Time Temperature and Humidity Data
The setup of the Sonoff TH is pretty simple. After tapping into the device you are presented with the device settings. On this page you can change from manual to auto settings. . When you change from manual to auto a setup screen pops up. On this screen you can choose between temperature and humidity through two radial buttons. After selecting wich parameter to use you set the above and below values. As an aside if the auto/manual button was bigger it would be easier to use. After tapping OK the device will act according to the setting selected.
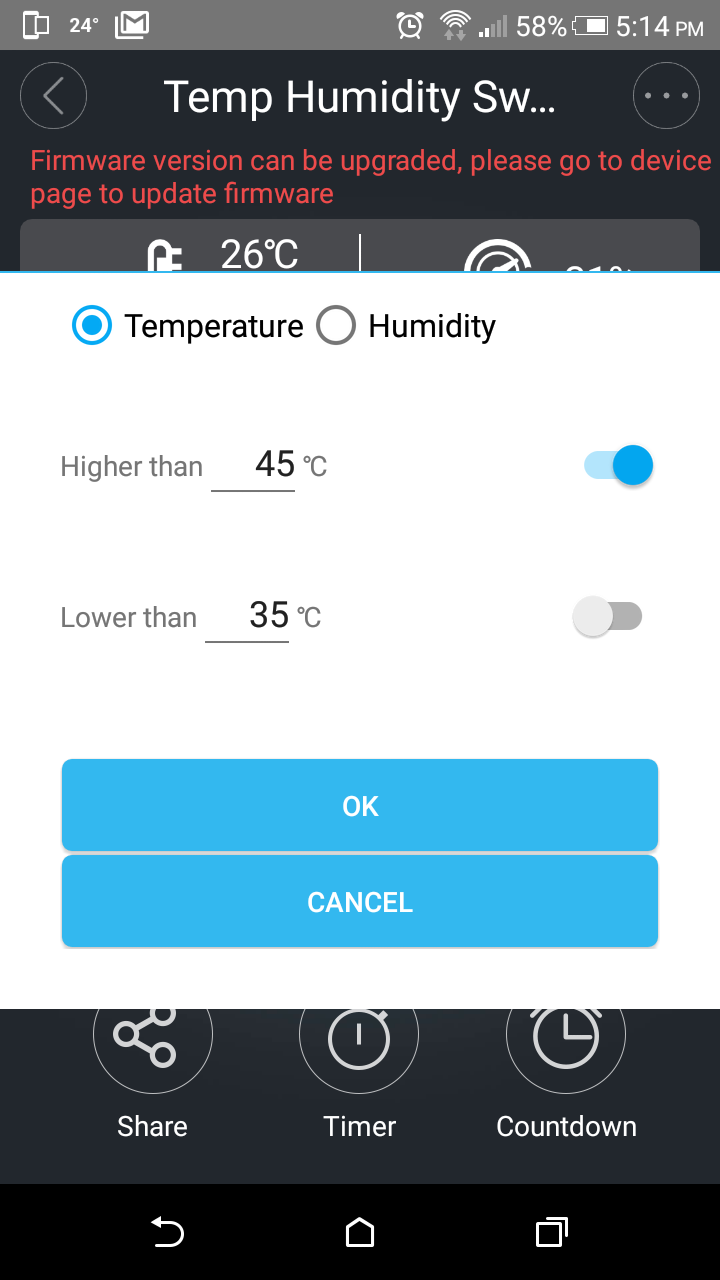
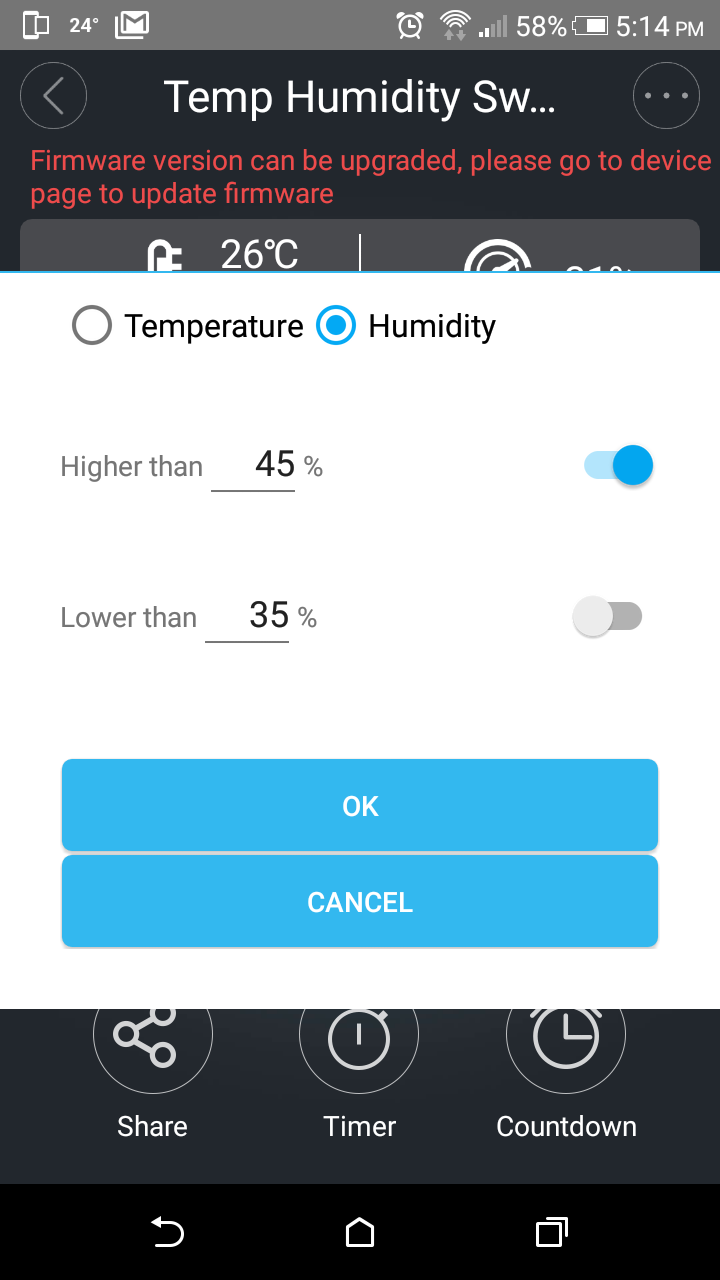
Setting Threshold Temperature/Humidity Values
The Sonoff SV is simpler as it only has a manual on/off button. It should be noted that both of these devices also have a the timer as well as a countdown feature. The countdown feature allows you to set an amount of time after which the device will either turn on or off.
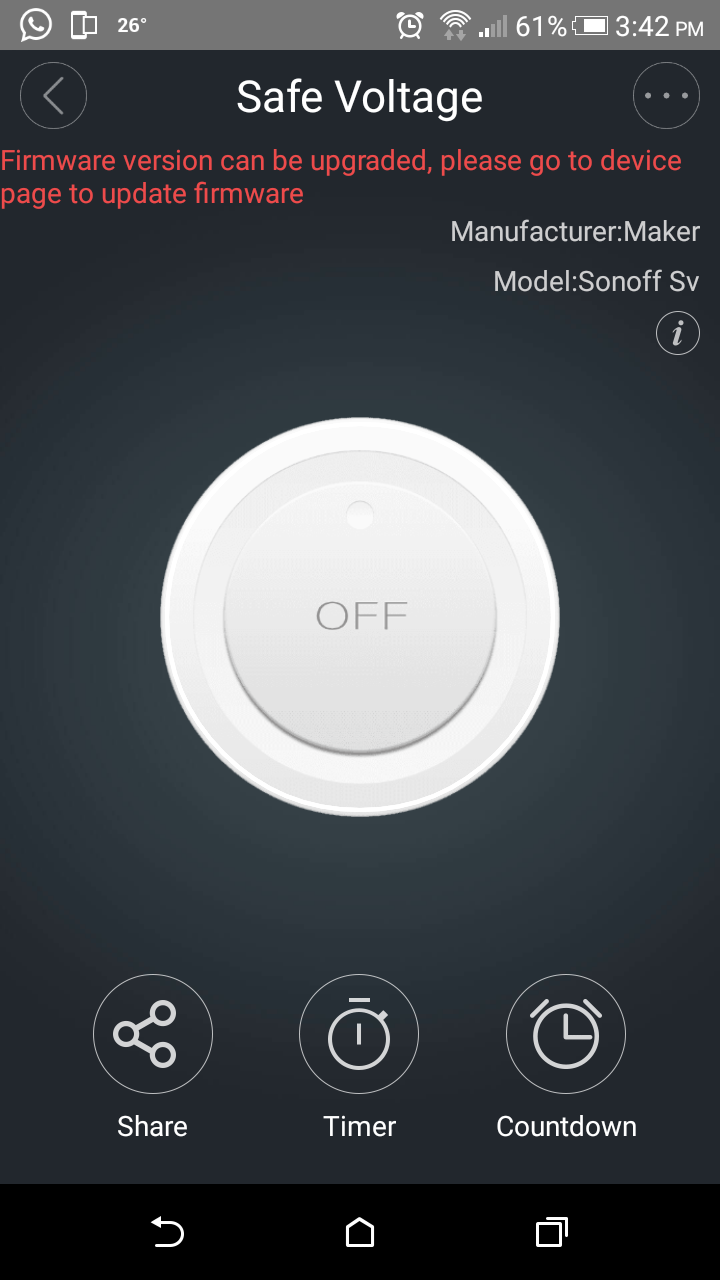
Sonoff SV device screen
The timer function allows you to set up to eight different times at which you want the device to either turn on or turnoff. Considering a regular timer costs over $20 CAD this a big deal in itself. This is handy for someone leaving their house or wants something like a phone to charge for a specific amount of time.
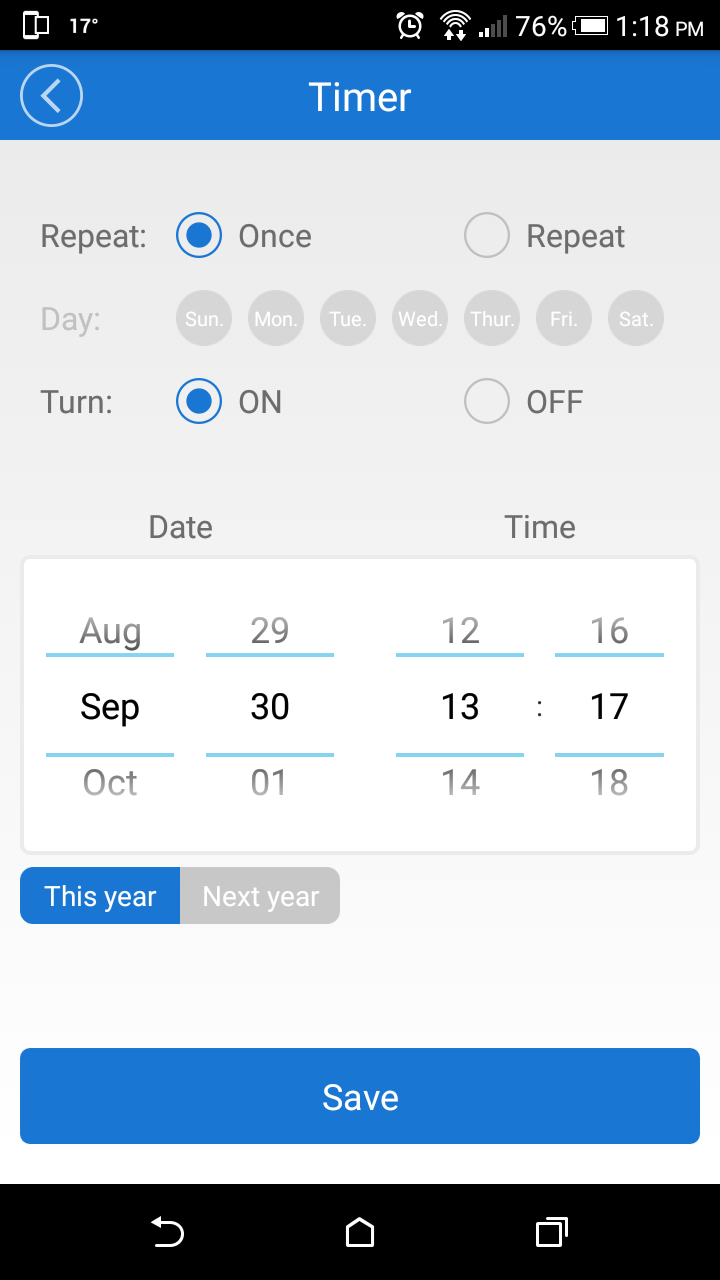
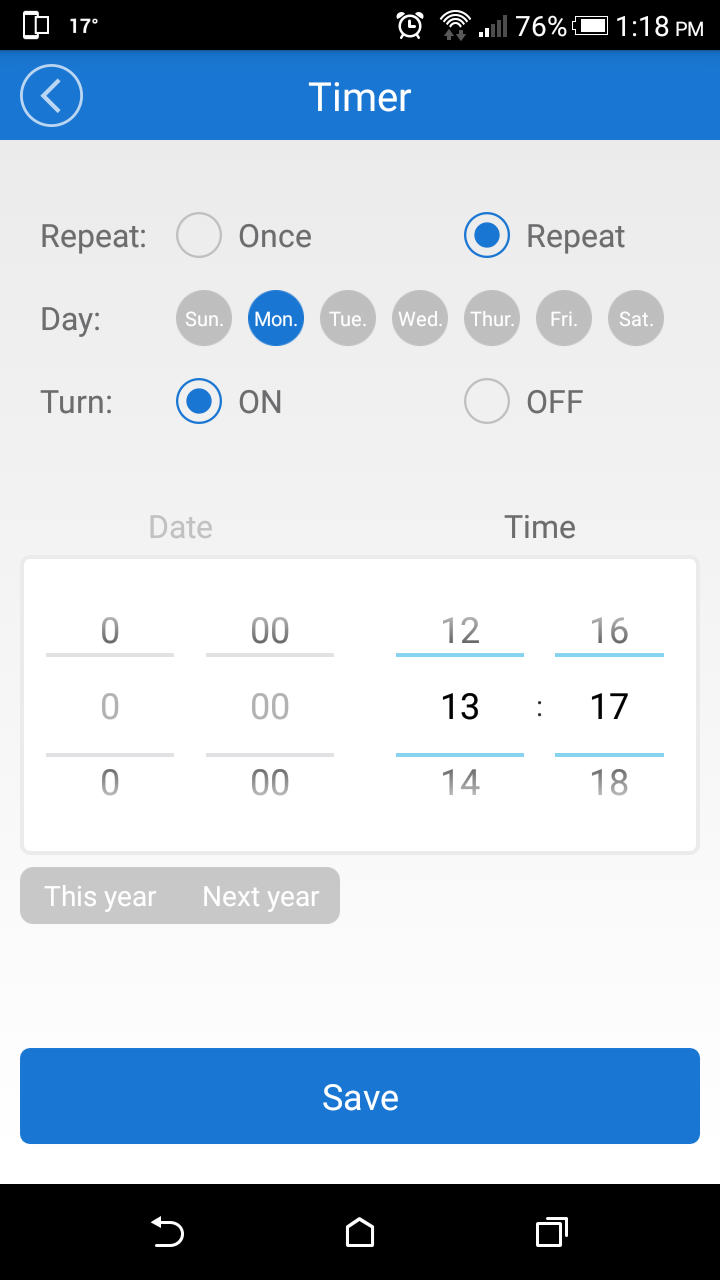
Sonoff timer screen
There is one more overlooked setting on all the Sonoff devices, that is the power on state. This allows you to set the state the Sonoff when the device powers on. This is useful for power outages or other issues such as someone inadvertently unplugging the device. In this case you can set the device to be on/off on power up.
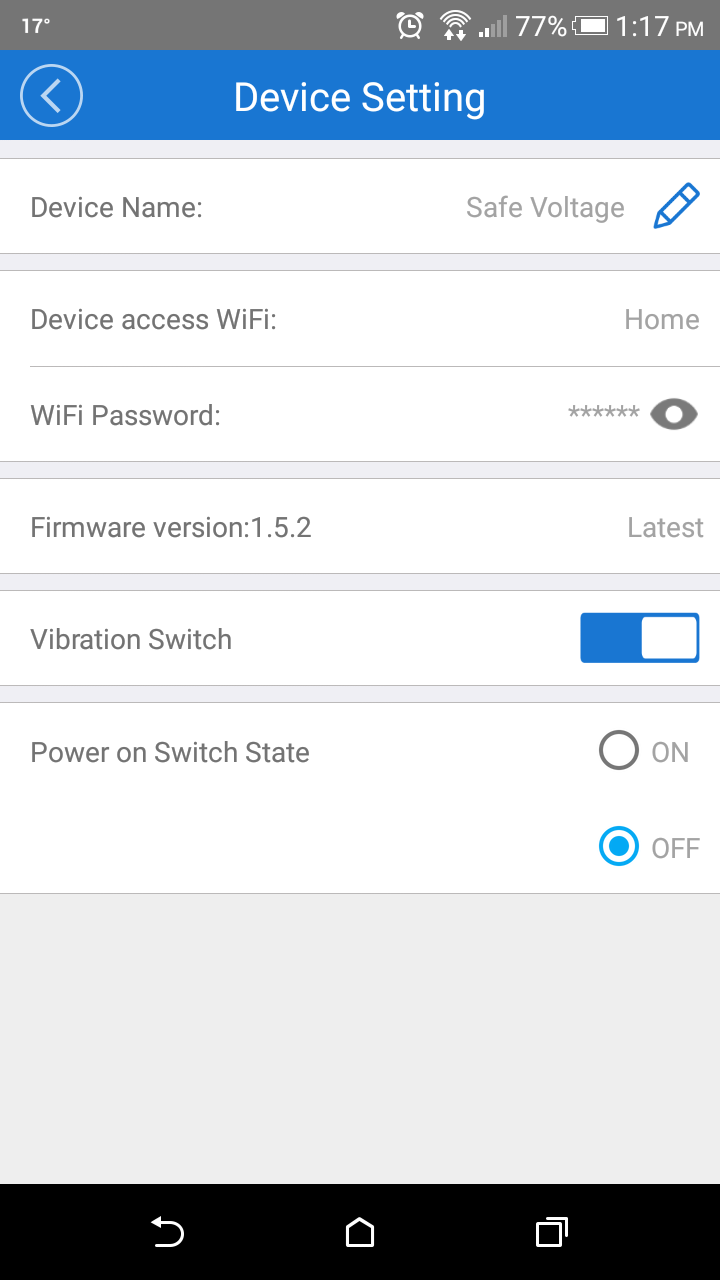
Sonoff settings screen
A new feature with the updated app is something called Scenes and an extension of this called Smart Scenes. A scene allows you to group various devices and set the state as you wish. This means you can have a bedtime scene were your room lights turn off, your bedside lamp turns on etc. Previously you could choose to have various devices all on or al off, this new Scene allows different states to be set for each device. An extension of this that is currently only available on the Sonoff TH, Sonoff, Sonoff RF, Sonoff SV and Smart Socket. In this Scene you can set the temperature above which the other devices should turn on. Hopefully this will be expanded in future iterations to not just have devices turn on but, also off as well as have different states change. If the addition of humidity control was also added the functionality would be completed for this extended Scene capability.
The only downside that with the app has already been mentioned. That is the way the WiFI password is handled. Hopefully after writing about this in two blogs Itead Studio will try find a fix so that the password, once entered, is not visible to anyone picking up your phone.
Power Consumption
Power consumption of both the Sonoff TH and the SV were attempted to be measured. This is relevant as these devices are meant to be left plugged in or connected to a power source at all times. The Sonoff TH was connected to a MCP39F511 from Microchip. This was used as it has decent reliability and I no longer have access to a PA1000.
![[000280].jpg](https://lh5.googleusercontent.com/7e67kw2zXkjPUe_aR6zzvQj1pWGpH1hMBlNIKYKxRH3dAYKiDtpJLwu6ngre3HPXn1x3_HYZ489ifpf1p_8IhAFC6VD-ZfVZz76ueu7E4dKefCPzc8A21t4nR9DosW0nUc-ORCPg)
MCP39F511 power measurement kit
The measurement from the MCP39F511 was between 0.4W ~ 0.67W. Comparing this with a previous measurement using the PA1000 for the original Sonoff shows the two are similar. The previous measurements appeared to average around ~0.54W but with the high and low ends in the same region.
The Sonoff SV was in the process of being setup to be measured when the unit stopped working. While the cause of this is unclear one thought may be the lack of reverse polarity protection. With no terminal blocks the connections are made either with older or by adding terminal locks. In my case neither were used instead breadboard wires were used. A miss connection may have lead to this issue.
Due to this I was unable to take power measurements for the Sonoff SV. If however it is the same regions as the original Sonoff this could cause an issue. With the SV presumably intending to be connected to a battery device, 0.5W could drain a sizable battery in just matter or days if not hours. I would hope this to not be the case and hopefully I will be able to do these measurement in the future and update this blog as accordingly.
Concerns
The Sonoff have proven to be great group of devices that are both easy to use and install. They allow almost anyone to setup their own home automation system and to control their home in away they they see fit. There are however a few concerns. The first is with updates of the software on either an Android or Apple phone. I have repeatedly be asked to upgrade but not through Google Play. while some people might not think much about this, to me it poses a security breach that I prefer to not open.
Another security concern is the accessibility the E-Welink app wants to the phone. Previously the app wanted access to the camera, WiFi information, Device ID etc. In the most recent upgrade the app wants access to the microphone, SMS and it it already has access to your location and call logs. Again some people may not think much about this but, such overreaching access to information in concerning and unwarranted. It should be noted I have NOT upgraded to the most recent firmware. I may rather find a new way to use devices that frees me of the constant monitoring by unknown and possibly untrusted parties.
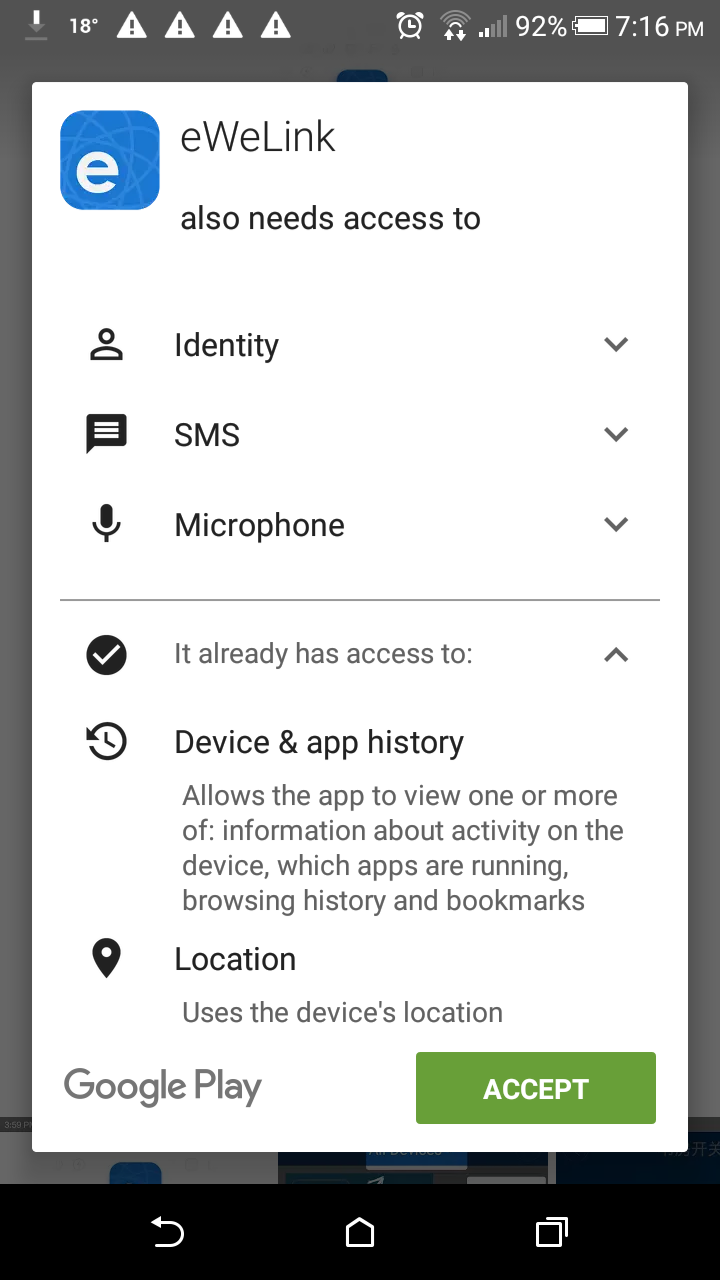
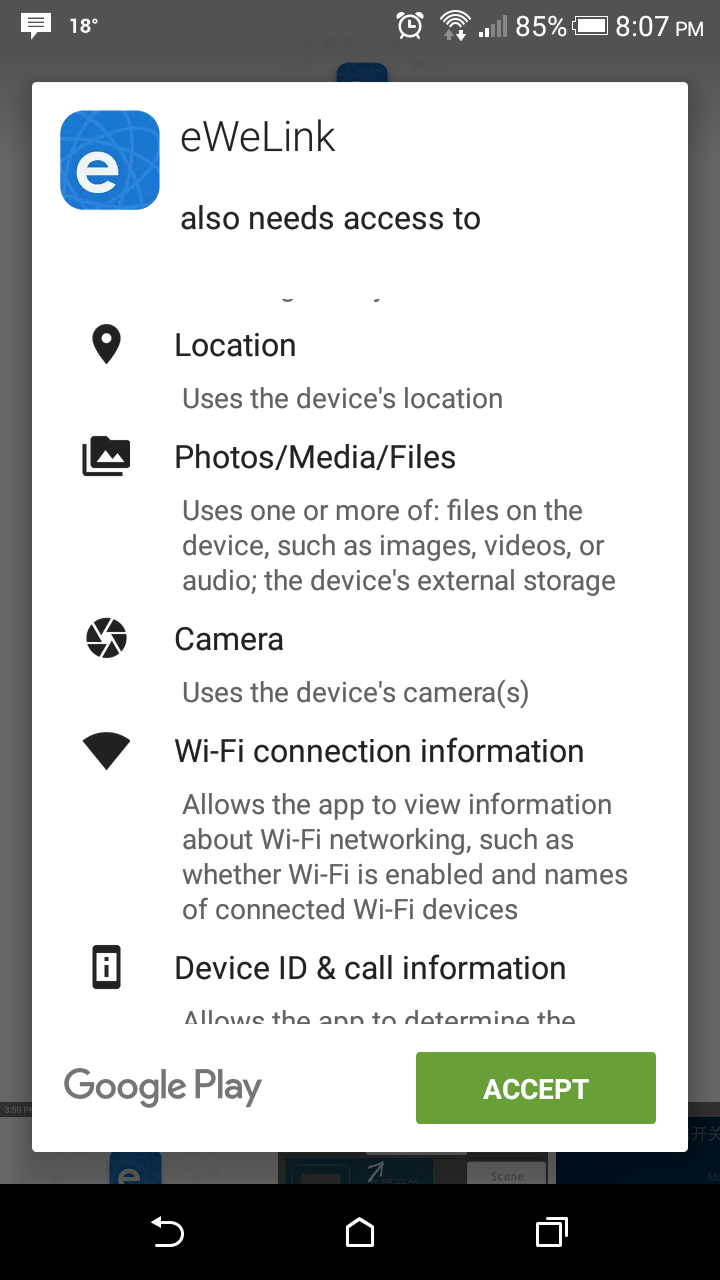
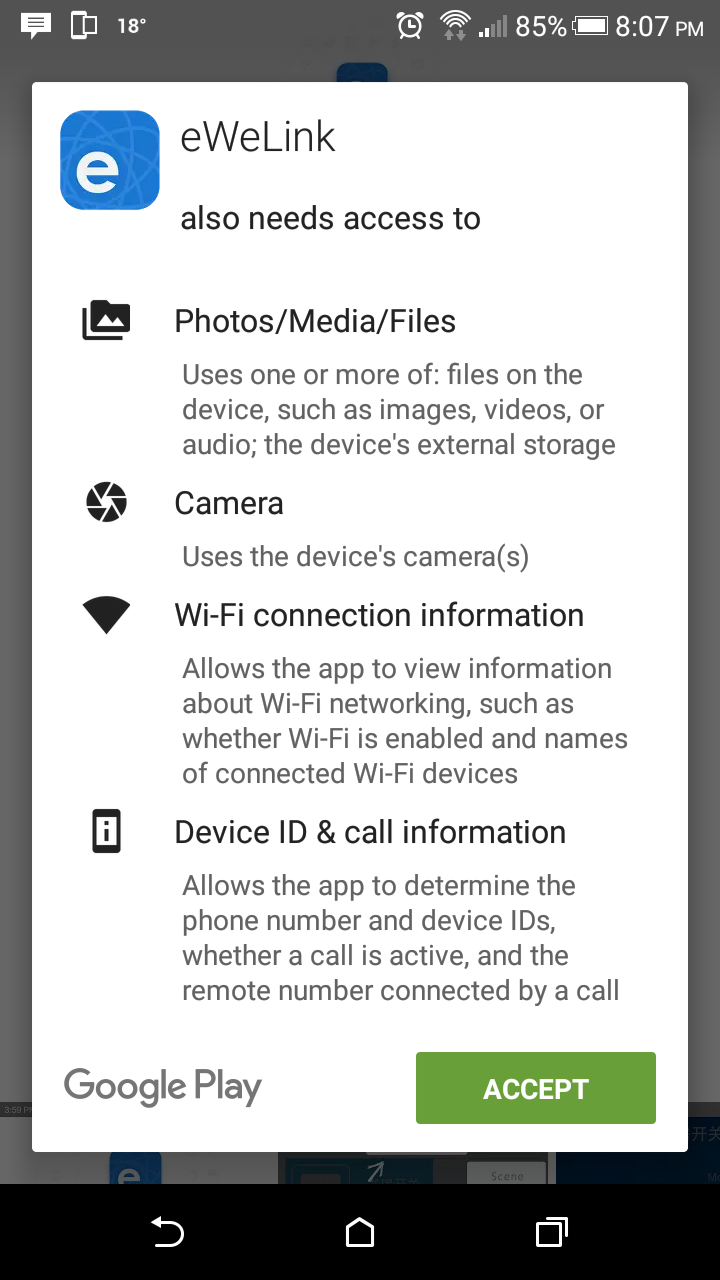
eWeLink “NEEDS” access to ALL these services....
Another security issue that has previously been mentioned but can not be stressed enough is the way the WiFi password is stored. Overall eWeLink has a lot of access to your phone and information. Unfortunately from what has been seen so far Itead Studio has not done much to secure this information or to show the user that this information is not being misused.
The another issue which has since been rectified for the Sonoff TH but not the Sonoff SV is the lack of cases. Without a reliable case the potential for an electric shock or shorting between conductors is always present. This presents a risk that a lot of people would not be willing to take if they young children or pets around.
Conclusion
Overall the Sonoff product line has been expanded in a useful way. These two products really allow for a wider number of devices to be connected to the IoT easily. While there are some things that Itead could improve with their app the overall experience is very good. The simplicity with which the Sonoffs can be installed really makes home automation something that anyone can do.
Can the polarity of the input 90~250V AC be changed or ignored for SoNOFF RF?
ReplyDeleteHello maxxzaxx,
DeleteIn theory you could ignore the polarity of the Sonoff as in reality it's just two traces from one end of the PCB to the other with one having a relay in line. That being said I would not recommend doing this as then the device you are witching will remain live even though its off. What you want is the relay to disconnect the live wire so that there is no power supplied to the end device. I hope this helps.
Kas