Showing posts with label mangOH Green. Show all posts

Friday, November 11, 2016

Getting Started with the MangOH Green and Legato 16.07 on Ubuntu 16.04.1

IMAG1544-1.jpg

The MangOH Green is a board developed by Sierra Wireless to allow for easy development with their WP modules. These modules are specifically built for mobile/cellular IoT and have both cellular and GPS radios built into the chip. The MangOH Green runs a Linux application framework called Legato. Sierra Wireless has been working hard to keep the software moving forward. This has produced a number of versions each with subtle changes, and while there is a starter's guide for Legato that document has now become partially dated. This along with the relative newness of the manGO board and unique approach there is not a lot information to be found searching online, this however has been changing. As mangOH/legato becomes more popular the online content will also become more plentiful

With first hand experience as well as great help, from both the forums and mangOH personal,  in getting my MangOH board running I have decided to document the steps I followed to get the newest virtual machine version  “mangOH Dev using Legato 16.07 on Ubuntu 16.04.1” up and running.

The first thing to mention is the password for this version of the VM has been changed from “legato” to “mangoh”. While this has not been documented this was asked on the forums and has been answered. NOTE: This is only for 16.07 but moving forward the password will either be removed altogether or remain as “mangoh”.

The overall process follows a few basic steps each of which will be further explained below. The first step is to download and install the VM from mangOH. Then the firmware on the mangOH board should be updated. In the VM the environment variables are added to the batch file, the repository is updated, legato is updated and installed on the mangOH board. Finally the timerLed demo is compiled and installed on the mangOH board and the application is started. Each of these steps are explained in better detail in the steps below. It should be noted that steps 1 - 12 should only need to be done the first time the mangOH board is used. After the first time either 11 and 12 can be used or 13 - 15 can be used to add a new application to the mangOH board. Steps 16 - 19 always needs to be done to have the Legato application started on the mangOH board.

  1. Download VM from the mangOH site
  2. Attach the mangOH board to the PC and update the firmware
    1. Download the “Generic” Windows EXE file
    2. Double click the executable (run the file with the board attached to the PC)
    3. Follow the onscreen instructions (it may take some time). If the system hangs for more than 20 minutes do a power cycle on the board and restart.
2016-11-09 17_39_39-C__Users_Kas_AppData_Local_Temp_RarSFX0_fdt.exe.png

  1. Install the VM
    1. Follow the step #4 “Prepare your computer for Legato development” in either - “mangOH Fundamentals— Windows (Linux VM) + Legato CLI
These PDFs can be found under “getting started” on at the mangOH site

In the VM
  1. Open the VM and add  “source ~/legato/packages/legato.sdk.latest/resources/configlegatoenv” to .bashrc file
    1. Open a terminal window
    2. $edit .bashrc
    3. Scroll down to the bottom of the press the “insert” key on your keyboard
    4. Add the “source…” line at the very bottom of the file (after the last “fi”)
    5. Lastly enter “:wq” this will save and exit the editor
(Note: Moving forward to to Legato 16.10 this step will no longer be needed)
2016-11-09 20_15_56-mangOH Dev using Legato 16.07 on Ubuntu 16.04.1_1-Test [Running] - Oracle VM Vir.png

  1. cd mangOH/
  2. repo sync
2016-11-09 23_33_58-mangOH Dev using Legato 16.07 on Ubuntu 16.04.1_1-Test [Running] - Oracle VM Vir.png

  1. cd legato/
  2. source ~/legato/packages/legato.sdk.latest/resources/configlegatoenv
(This step is not needed if close and then reopen the terminal)
  1. make wp85
2016-11-09 23_24_00-mangOH Dev using Legato 16.07 on Ubuntu 16.04.1_1-Test [Running] - Oracle VM Vir.png

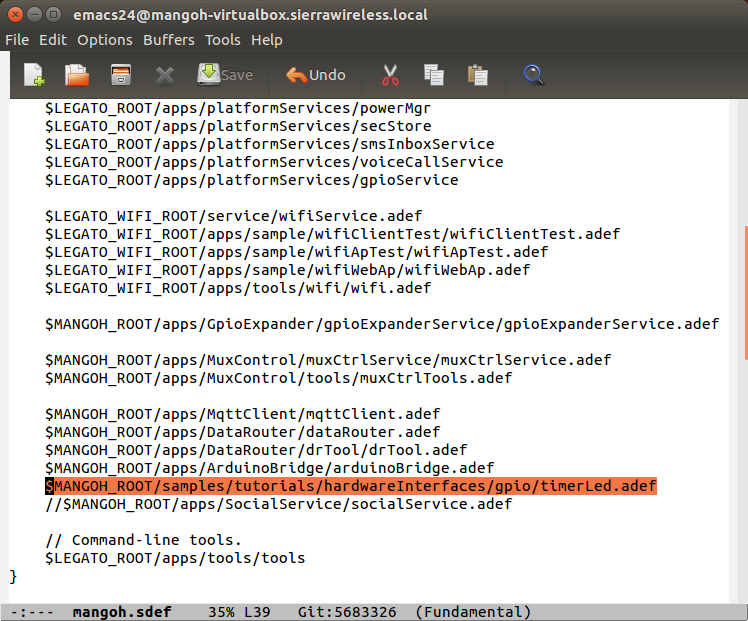
  1. Add timerLed.adef to mangoh.sdef
    1. Open emacs
    2. file->Open file
    3. mangOH->mangOH->mangoh.sdef
    4. Under “apps:{“ add “$MANGOH_ROOT/samples/tutorials/hardwareInterfaces/gpio/timerLed.adef”
    5. Save and close emacs
2016-11-09 21_07_34-Program Manager.png


  1. instlegato wp85 192.168.2.2
2016-11-09 23_27_47-mangOH Dev using Legato 16.07 on Ubuntu 16.04.1_1-Test [Running] - Oracle VM Vir.png

  1. cd mangOh/mangOH/samples/tutorials/hardwareInterfaces/gpio/TimerLed/
  2. mkapp -t wp85 timerLed.adef
2016-11-09 23_30_20-mangOH Dev using Legato 16.07 on Ubuntu 16.04.1_1-Test [Running] - Oracle VM Vir.png

  1. app install timerLed.wp85.update 192.168.2.2
2016-11-09 23_32_00-mangOH Dev using Legato 16.07 on Ubuntu 16.04.1_1-Test [Running] - Oracle VM Vir.png

  1. ssh root@192.168.2.2
  2. app status (should see “[stopped] timerLed”)
2016-11-09 23_18_10-mangOH Dev using Legato 16.07 on Ubuntu 16.04.1_1-Test [Running] - Oracle VM Vir.png

  1. app start timerLed
2016-11-09 23_20_48-mangOH Dev using Legato 16.07 on Ubuntu 16.04.1_1-Test [Running] - Oracle VM Vir.png

  1. You should now see the LED next to SW200 and the reset switch blinking

I have tested these steps out on a new install of the VM and have not encountered any issues. If you do have any issues or or have any comments regarding the process please share them in the comments below.

I would like to mention that the constant addition of new APIs for the mangOH board have made programing the board that much easier. As someone with a background in embedded code on microcontrollers, digging into the kernel to get to the GPIOs or other ports would be a quite a feat. The mangOH team is also working to add more demos, thi would allow someone wanting to create a prototype to have numerous starting points as well as projects that they could merge to get a usable prototype for the concept they are trying to display.

As I keep working with this board I will hopefully add more blogs giving over my experience with working with the mangOH Green board.

Wednesday, September 21, 2016

IoT Hardware to Cloud Comparison Project: TI LaunchPad vs Sierra Wireless MangOH Green

too-many-choices1.png


The internet of things (IoT) has become unquestionably the next biggest thing and already has blown up faster then most people could have imagined. As the IoT gains traction more companies will be seeking to to provide IoT components. This market includes everything from ICs and modules to fully connected hardware platforms and all the software in between, as well as the cloud platforms to which remote sensor data is uploaded to and analyzed.


With so many options in the hardware, software and cloud platforms it can often be confusing to decide on one option or even to know why to choose an option. Since this is only becoming an increasingly bigger issue I decided to try and do a comparison between two setups that would accomplish the same task. The task to be implemented would be to monitor power consumption in semi-real time. The data sampled would then be uploaded to the cloud to provide information such as power consumed, line voltage, power factor etc. The success of each system would be judged by the simplicity of getting a prototype running and the possibility to move that into a final product.


Measuring Power Consumption
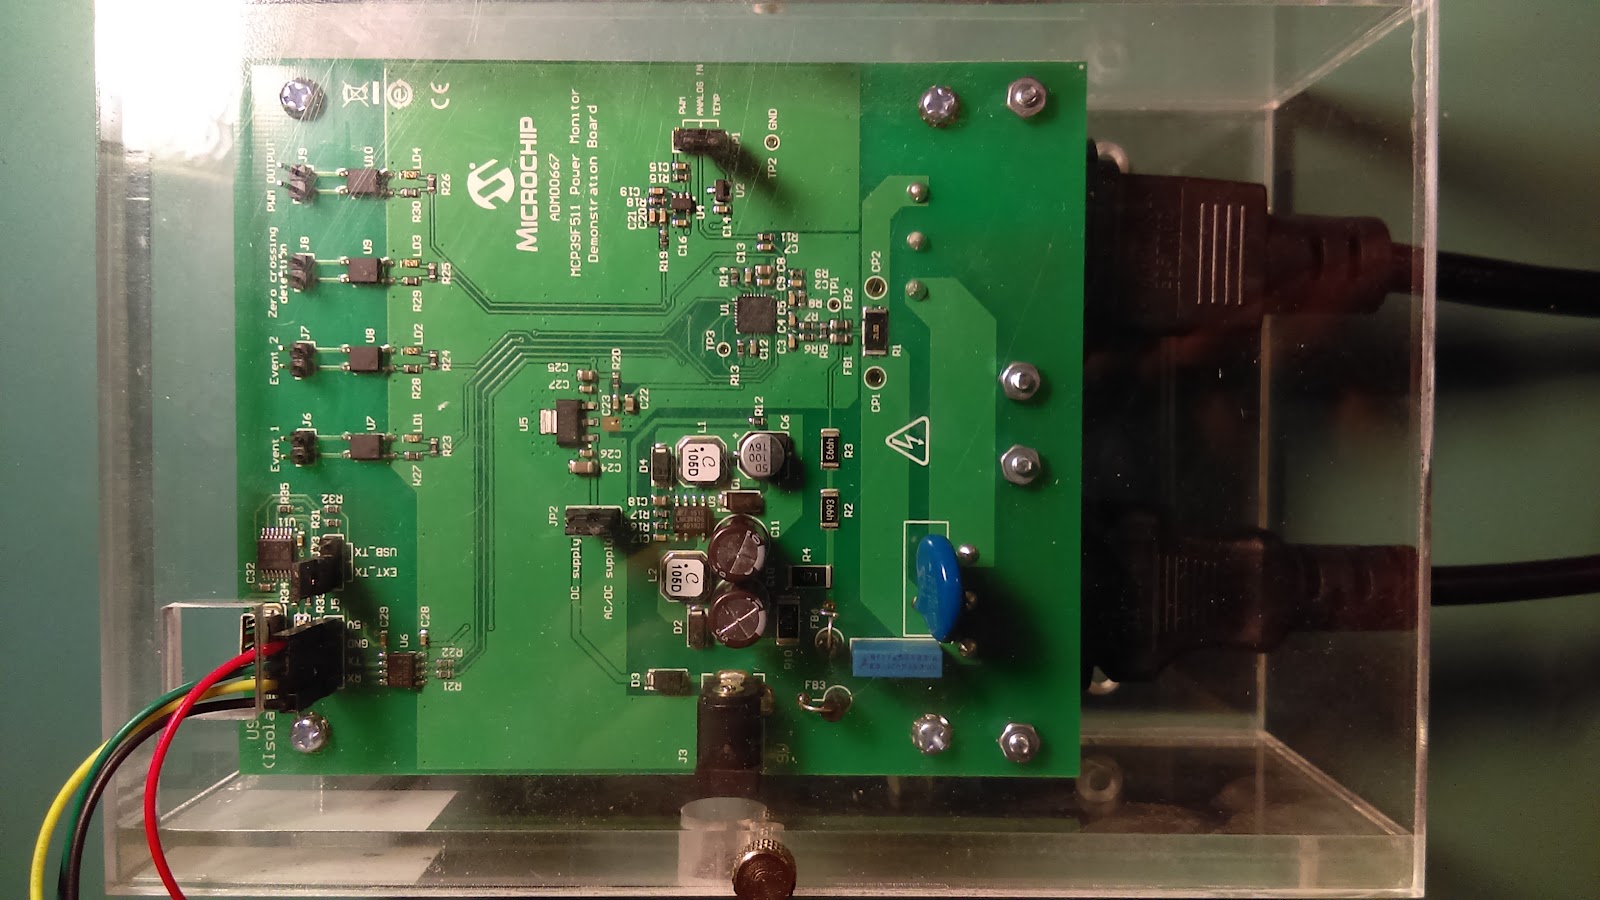
The MCP39F511 from Microchip was selected to do the power measurements due to its ease of use and availability. Specifically the ADM00667 demonstration board was used since it provides everything needed to use the MCP39F511 without needing to design and build a board. The MCP39F511 can output 11 commonly used values that are tracked and can be easily exported. These values include line voltage, current, power factor, and energy counters among others. For this project the calibration and tuning variables were left unchanged as they provided relatively good values.


ADM00667 Power Demonstration Kit for the MCP39F511


The Hardware
The two hardware platforms selected were the MSP430 Launchpad series from Texas Instruments and the mangOH Green from Sierra Wireless. The MSP430 was selected for its ease of programming (Energia is used in this project) as well as its ability to be upgraded to a full production product with code written in C.


The project was first implemented using the MSP430 Launchpad ecosystem. The platforms looked at here included the MSP430FR5969 and the MSP430F5529. The project initially started with the MSP430FR5969 because of the simpler chip design and lower power consumption in sleep time. Unfortunately the WiFi stack or another portion of the provided connectivity libraries appears to have a bug that causes the system to disconnect after a few transmissions.

MSP430FR5969 With and Without the CC3100 Mounted


This portion of the project was therefore moved to the MSP430F5529. This is a board that has been used before in other Wi-Fi and IoT projects with some success. It was hoped that the current iteration of the libraries would fare better, which thankfully they have.


MSP430F5529 With CC3100 Mounted and UART Connections to MCP39F511


The Wi-Fi connection is provided by the CC3100 BoosterPack. This is an easy to connect board that uses SPI to communicate with the host processor. The board follows TI’s boosterpack standard and therefore easily allows other boards or devices to connect without interference.


CC3100 Boosterpack


The second implementation of the project will use the mangOH Green board from Sierra Wireless. The mangOH board offers a lot of functionality that enables it to easily and reliably talk to various sensors. This includes mangOH IoT connectors, an Arduino compatible connector, USB and RS323 and RJ45 among others. The mangOH also has the ability to communicate over cellular networks removing the need to have a WiFi or ethernet connection. The operating system running on the mangOH is Linux based Legato. This provides the ability to prototype with the mangOH in various software languages.


mangOH Green Development Kit with WiFi and Breakout Expansion Cards Installed


Other hardware platforms were considered but for various reasons were not selected. The ST Discovery platforms were considered but were rejected due to a lack of programming resources available to easily and quickly produce a functional prototype. While mbed does allow for quick prototyping the steps involved in doing so and the need to be online at all times were seen as drawbacks for quick prototyping. Arduino was also an option but, due to the ability to produce the same prototype using Energia and the ability to move past a prototype if needed made the MSP340 series superior for this comparison.


options.gif


The Platform
The cloud platforms looked at include a long list of which only one has been selected for use at this point and one has been tentatively selected by default. Others may be explored in later blogs. The first cloud platform selected is M2X from AT&T. This platform was selected because of it very broad range of supported languages and operating systems. M2X can be used, to name a just a few, on Arduino, mbed, BeagleBone, Raspberry Pi and Energia. M2X also supports languages that include but are not limited to C, Java, Node.js, Python and Ruby. With this wide range of options it allows for a project to be easily implemented on a large range of platforms and software formats. The second cloud platform being considered for review is AirVantage from Sierra Wireless. This was given higher priority due to one of the platforms being used in this review was designed by Sierra Wireless and uses their processor.


In selecting M2X and AirVantage other cloud platforms were looked at but, like in most projects a quick and justifiable decision needed to be made. Below is a list of the platforms looked at and a brief explanation why they weren't used. Since the goal of the project was to produce a prototype in a short period, it should be noted the main reason for rejecting a platform was due the inability to get the correct information quickly and easily.


This platform is currently under review due to one of the selected platforms having been produced by Sierra Wireless and the hope that the two should be easily connected reducing prototyping time.


A brief look showed all supported devices need an OS. This was a big negative considering that most nodes do not need to contain heavy computing power but rather a simple Wi-Fi connection to upload data.


This was an option but could not quickly find how to use WiFi with my device and their service. Good tutorials to get started but in the end the steps needed to get moving were longer than the final choice. This may be looked at again in a later version.


This was also an option but with no easily visible where the data would appear. It also appeared that the data would appear on other platforms that could be easily uploaded to directly. If multiple platforms were going to be used (pull from one and push to another) this would be a great option.


Tago does not provide a way to implement their solution using the desired hardware platforms.


This looked like a great option but again complexity of the website made this a choice to come back to if something simpler could not be found. This may be an option for a later implementation of this project.


This platform provides a REST API that would have been useful but curl is needed. From all the looking around cul needs some form of OS to run correctly. Either way this wasn't a quick prototype option.


Convoluted website, finding something to get started easily and quickly was not possible.


Another convoluted site with a lot of information but nothing to get me to what I needed in a short time or with any reasonable guidance or explanation.


This was by far the most convoluted website. Trying to find just a service that may work for my application was a task. Once this was found, if you do find it, getting any information on how to get up and running quickly is even harder to find if it at all possible. Definitely a platform I would avoid for now.


Original post on Element14 can be found here